How to Set Up XOutput: The Ultimate Windows 10/11 Guide
This guide will walk you through transforming your generic DirectInput controller (USB Joystick, PS3/PS4, etc.) into a fully functional Xbox 360 gamepad compatible with Game Pass, Steam, and Epic Games.
📋 Prerequisites
- ✓ Controller connected via USB or Bluetooth.
- ✓ ViGEmBus Driver installed (v1.21.442+).
- ✓ .NET 7 Runtime installed.
📺 Watch the Video Tutorial
Prefer watching over reading? Check out this 5-minute setup guide covering driver installation and button mapping.
Add & Detect Your Controller
First, launch XOutput.exe as Administrator. This ensures the application has the necessary permissions to create a virtual device and save your settings.
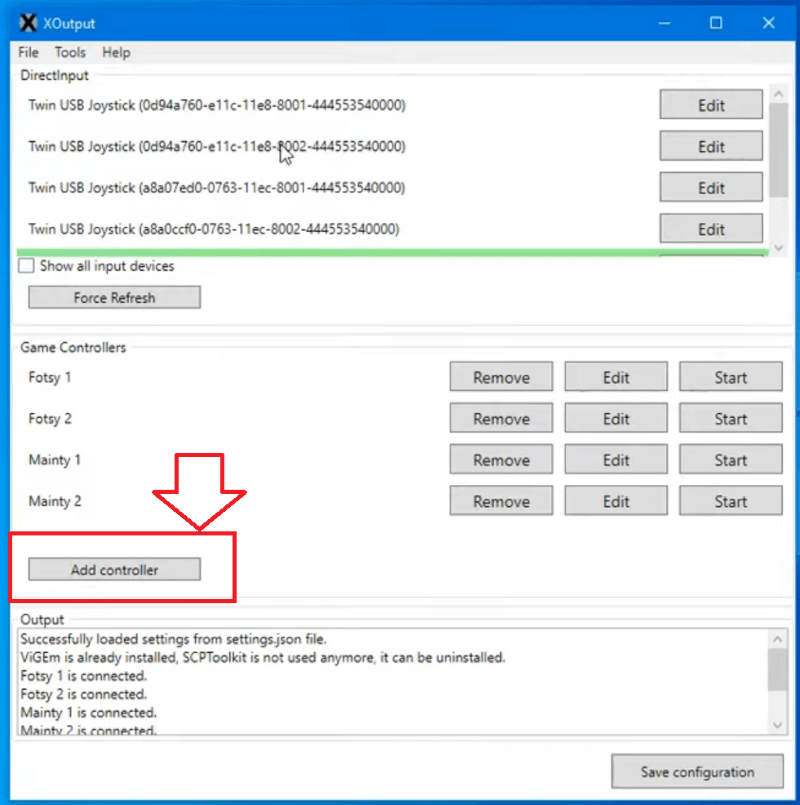
Understanding the Interface
Once you click “Add Controller”, a new line will appear in the list (usually named “Controller 1”). You will see two key sections:
- Game Controllers (Input): This shows your physical device (e.g., “Generic USB Joystick”). If this says “Missing”, Windows does not detect your hardware.
- Emulation (Output): This is the virtual Xbox 360 controller that XOutput will create.
💡 Troubleshooting Tip
If you see multiple devices listed under “Game Controllers” and aren’t sure which one is yours, unplug your controller and see which name disappears from the Windows “Set up USB game controllers” (joy.cpl) panel.
Map Buttons & Axes
Click the “Edit” button next to your controller. This opens the mapping window where you link your physical buttons to the virtual Xbox 360 inputs.
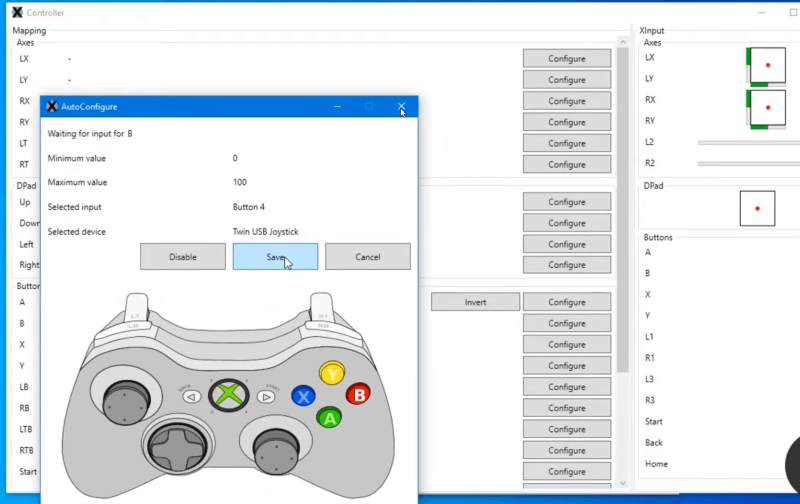
🕹️ Configuring Analog Sticks (Axes)
Scroll to the top section labeled “Axes”. This controls your Left Stick (movement) and Right Stick (camera).
-
Click “Configure” next to
LStick X. - Move your physical Left Stick Left and Right. XOutput should automatically detect the axis.
-
Repeat for
LStick Y(Up/Down), and the Right Stick axes.
🔧 Fixing Stick Drift (Deadzone)
If your character moves by itself, increase the Deadzone slider. A value between 5% to 15% is usually enough to ignore slight stick drift on older controllers.
🎮 Configuring Buttons
Scroll down to the “Buttons” section. This maps A, B, X, Y, Start, Back, and Bumpers (LB/RB).
- Click “Configure” next to a button name (e.g., Button A).
- Press the corresponding button on your physical controller.
- Verify that the green bar lights up on screen when you press the button.
Triggers can be Axes or Buttons depending on your device. Try mapping them under “Axes” first (Z-Axis). If that fails, scroll down and map them as standard Buttons.
Start Emulation & Verify
Configuration is done! Now it’s time to activate the virtual controller and ensure Windows recognizes it correctly.
1. Activate Controller
Close the mapping window. On the main screen, click the “Start” button next to your controller.
2. Verify XInput Detection
We need to confirm that Windows sees a new “Xbox 360 Controller”.
- Press
Win + Ron your keyboard. - Type
joy.cpland hit Enter. - You should now see a new device listed as “Controller (Xbox 360 For Windows)”.
Note: If you select it and click “Properties”, your button presses should light up the Xbox indicators.
Pro Tip: Auto-Start with Windows
Don’t want to open XOutput every time you reboot? Let’s automate it.
- 1. Go to Settings (Gear icon).
- 2. Check “Start with Windows”.
- 3. Check “Start Minimized” (to System Tray).
- 4. Click Save Configuration.
Experiencing “Double Inputs”?
If your game detects two controllers (Player 1 & Player 2) or menus skip twice with one press, you need to hide your physical device.
This happens because the game sees both your real controller (DirectInput) and the virtual one (XInput) created by XOutput. To fix this, we use a tool called HidHide.
How to Configure HidHide
Install & Open HidHide
Ensure you installed HidHide from our Download Page. Search for “HidHide Configuration Client” in the Start Menu and open it.
Applications Tab (The Whitelist)
Go to the “Applications” tab. Click the “+” button and find your XOutput.exe file.
* This tells Windows: “Only allow XOutput to see my real controller.”
Devices Tab (The Blacklist)
Go to the “Devices” tab. Check the box next to your physical controller (it usually has a red lock icon).
Do NOT check the “IG_…” device (that’s your virtual Xbox controller).
Enable Device Hiding
Finally, check the box at the bottom that says “Enable Device Hiding”. Your real controller is now invisible to games, but visible to XOutput!
🎉 You’re All Set!
Your controller is now configured and optimized. Launch your game and enjoy.